Wednesday, December 1, 2010

Rice snowmen ...

Grade Level : Kindergartners (but it can be adapted to older children) .
WARNING : There will be small pieces (like buttons , pompoms ,etc ) Thoses pieces could cause a choking hazard ! So this craft is NOT suitable for children under 3 or any children who are still putting things in their mouth !!!

Motivation : Living in Southern California , we have no snow ...so turning to white socks to make a snowman is a great alternative ! Also with the cold weather and winter just around the corner , it is just the perfect art lesson for the season . With the holidays approaching , it will keep the children entertained and busy ....

Material :
* white sock (1 per student ) Tube socks are the best , but they may be hard to find . Adult crew socks will fine .

* white yarn

* uncooked rice for filling the socks

* pompoms ( 1 for the hat . Some smaller ones can be used for buttons , eyes and nose if you wish )

* Some orange clay or orange play dough ( to make a carrot for the nose )

* Some felt of various color for scarves , mouth , mittens , skis , etc ,

* 1 white chenille for arms (you can use a brown one if you want the arms to look like branches )

* sharpies to print details on scarves or/and hat

* any other small items from the craft store that you want to use for decoration such as fake berries , tiny pine cones , fake pine branches ,cinnamon sticks , etc .

* hot glue or super glue

Activity :

1. Give each student one white sock .

2. Have each student fill the bottom of their sock with 3/4 of a cup to 1 cup of rice depending of the size of the sock .

3. Once the rice is inside the sock ,toss it around a little to make a round shape . Then have the student tie a knot with white yarn .

4. Have the students add another 1/2 cup of rice to the sock to make the head . Shape it so it is round and tie a knot with white yarn at the top .

5. To create the hat , ask the student to turn over the reminder of the sock . They can have the choice to tie the top of their hat with another piece of white yarn , glue a pompom or cut the top to make fringes . Whatever they prefer .

6. They can now start decorating their snowman . To make a scarf , they should cut a long rectangle of felt and glue it to the neck area of the snowman .

7. They can glue buttons or small pompoms for the eyes and the buttons of the snowman .

8. They can also cut small circles of black felt with a whole puncher to make the mouth .

9. They should then take a small amount of orange clay or play dough and make a carrot for the nose . Glue it to the snowman's face .

10. They should shape the chenille around the snowman body and glue it . It will be the arms . They can also glue some small berries or flowers , or cinnamon sticks to the arms if they wish to .

11. With a Sharpie , the students can finally add the last details to their cute little snowman .

I hope you will enjoy this project as it is a fun one for the students !

Examples :


Friday, July 30, 2010

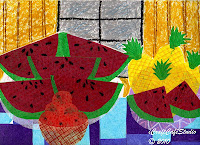
Artists paint food .

Grade level : 3rd grade ...but as most art lessons in this blog , this project can be easily be adapted for any grade level .

Motivation : Did you notice the different fruits and vegetables at the supermarket ? Did you notice the different shape and texture they have ? Carrots are long triangles . Potatoes are lumpy ovals . Green beans are long and thin . Tomatoes are circular . What shape are pineapples ? Artichokes ? Radishes ? Pears ? Strawberries ?

Materials : * colored paper
* a variety of colored tissue paper
* white glue (or paste mixed with liquid cornstarch if dealing with small kids )
* brush for applying glue mixture (if dealing with small children )
* white manila paper
* scissors
* black felt pens
*crayons

Vocabulary :

Collage : a picture made by fixing different thing onto a surface , such as a piece of cloth onto paper .

Multiple : more than one .

Arrangement : the way you place things so they look attractive , as in a flower arrangement .

Resources : this project was inspired by a lesson plan of my son's school art docent program . However I applied a few modifications .

You may want to have pictures of fruits and vegetables available (or waxed or real things .)

Here are the artists and the paintings that we are going to look at today :

(1) Walter Williams : (1920- ) He is a painter , print-maker and sculptor . He was born in Brooklyn in 1920 . Maybe he wanted to show us a place where his mom shopped when he was a little boy .
Poultry Market : This painting shows us a portion of a market . Supermarkets have now replaced a number of small stores that specialize in meat and poultry . (Poultry = chickens and turkeys .) It's a bright colorful picture . We see two figures on the right (one of them with the hair repeating the pattern of the rooster's tail .) We also see eggs for sale . The rooster is brightly colored . Can you see the scale ? Can you see several chickens hanging up ready to be sold ?

(2) George Braque : (1882-1963) He was a French artist . His father gave him his first art lesson . With Picasso he founded cubism .
Still Life With Purple Plums : Here we have to look harder to find the food because it is painted in a style called "Cubism" . It is very different from Cezanne's painting "the kitchen table" (see # 4) . It appear to have flatness . It could almost be made of pieces of paper cut and pasted down . The different pieces interlocked each other like a jigsaw puzzle . The top of the table is seen and it almost look like an object could slide off . What shapes are repeated to make a pattern ? Do you see any outlines ? What do you see in the background ?

(3) Romare Bearden : (1914 - ) He was born in North Carolina . He served in the army in WWI and began to paint very flatly . He is an African-American artist .
Summertime : The artist created this composition combining paper and fabric with painted areas to create the mood of summer in a crowded city . Does it remind you of Braque cubism style ? The figure eating ice cream is centered to attract attention . The overall arrangement is in rectangular shapes and strong vertical forms .

(4) Paul Cezanne : (1839 - 1906) he was a French artist . Cezanne was a great artist and was called the "father of modern art" because he changed the direction the painters were going . He was interested in the basic form and structure of things ...
Kitchen Table : Cezanne loved to paint food . In fact , when he did paint people he told them to "sit like an apple" . (He didn't want them to move !) He took a long time to paint his pictures . Sometimes the food would get spoiled before he was finished , so he started using waxed fruits . Here we see fruits , a sugar bowl , and a teapot , in the foreground , and a basket filled with fruits in the middle ground . The table is crooked and the teapot stand at an angle . He distorted (changed) things in order to increase the decorative aspect of his work . The colors are warm , homier , of beauty in everybody's life .

(5)
Nicholas Maes : (1632 - 1693) He was a Dutch artist . He was born in the 17th century . He was the son of a well-to-do soap manufacturer . He studied Rembrandt in Amsterdam when he was 16 .
An Old Woman Praying : This old woman is seen praying before she eats the food on the table . The light strikes the head and hands of the old woman who is so absorbed in her prayer that she is unaware of something happening . What is it ? (The kitten is pulling the tablecloth trying to reach the fish on the table .

(6) Johannes Vermeer : (1632 - 1675 ) Vermeer was a Dutch artist . He was born in Delft in 1632 .
The Milkmaid : This milkmaid is seen pouring milk . Other things that you can see are the bread , the jugs , the baskets , the brass pots . The warm yellow along with the warm of the red of her dress is balanced by the cool blues and greens . The repetition of colors helps to tie a painting together .

(7) Harold R. Stevenson : (1929 )
After School : Here we see a little girl having a snack after school . She is dressed in a blue dress with a white apron . We see her in profile . The artist painted many clear and realistic details to tell us about the room . (We see the wooden floor , rug , high-backed chair , flowers in the window , etc .) He even tells us what time it is .

(8) Pieter Brueghel the younger : ( 1564 - 1637 ) He was born in Brussels , Belgium . He liked to paint pictures with pheasants in their daily lives . His dad and his brother were also artists .
Harvest Meal : This pleasant landscape is filled with figures , some eating and some harvesting grain (which will be used to grind and make bread . Noontime . They hurry for more work to be done (no machine yet !)

Activity : 1. Select a piece of paper : white manila paper for the background .
2. Decide which fruits and/or vegetables you'll display in your collage market .Using the colored tissue paper , make multiple cuts , so that you can make a large number of tomatoes , bananas and apples , ... To do this fold the paper several times and cut through several thickness at once .
3. Use glue (or starch mixture ) to adhere neatly each pieces of tissue paper to the white paper . You'll need to plan your arrangement to include bins , racks , trays of vegetables , or baskets . You may even wish to include the grocer , the scale for weighing the fruits or vegetables and the shoppers and shopping carts . What else ?
4. Try to fill the entire space of your paper with cut pieces of paper . You can use colored paper for the bins , etc . You can also use the felt pen and the crayons to add other minor details .

Examples :
© 2010 © 2010

Friday, April 30, 2010

Birds Mosaics

Grade level: 2nd grade , but as all my projects , it can be adapted for any grade level.

Art Concept and Skills : Artists have painted pictures of various kind of birds , both realistic and imaginary . They used oil . watercolor , prints to tell us how they feel about birds .

Color tissue paper can be adhered with starch to white paper to make a collage , showing the feather patterns of birds' wings and tails .

Material : *white paper (9" x 11")

* tissue paper of many different colors
* Vano liquid starch and small containers
* brushes
* photos of all sorts of birds

Resources : the lesson plan idea was inspired by a lesson plan from my child school district.

There are many kind of birds in the world , and the way the artists paint them are just as varied . Some of the birds are easily recognized and others are products of the artists imagination . Birds have been painted by artists in every land in every age . Here are the paintings we are
going to look at today :
(1) Feathers in Bloom by Marc Chagall (1887-1985) . This painting shows a pale blue and white hen with her head turned around looking at a blue horse . The horse is somewhat of a fairy tale figure because it has human feet . They are set off by the dark background of a sky at night . What is unusual about the moon ? (Seen low in the picture .) The most important element of this work is its dreamlike fantasy atmosphere . The animal seem to be floating through the sky and talking to each other .
Marc Chagall was born in Russia . He studied art in St-Petersburg , then went to Paris where he was influenced by the cubist style .


(2) Happy Family by Nathaniel Currier and James Ives (1875-1907) . Nathaniel Currier and James Ives were partners in printing business since 1857 . They produced not only news items scenes but also pictures of everyday life . This lithograph was made by Currier and Ives from a drawing by F.F. Palmer . It shows a family of turkey in the woods. The father is spreading his wings while the mother watches her chicks eating . They are protected by the forest and surrounded by a strawberry patch . The birds are drawn accurately with every feathers shown realistically . The warm browns and greens and the attention to the details show the artist's love for the woods . The bird family seems protected and safe and happy in their natural setting .
(3) Flying Geese by Max Ernst (1891-1976) . Flying Geese shows geese flying over the desert and Grand Canyon of Arizona . A cactus bush is also seen in the middle of the painting superimposed on the Grand Canyon walls . Can you see it ? What give the mountains their texture ? Ernst placed his paper over a piece of wood so that the wood's grain would show in the design . The gold tones , the gray , whites and dark areas along with the wood's grain truly suggest the Arizona desert landscape . What color is the sky ? Does it make you think of the hot desert and colorful sunset ?
Max Ernst was a German surrealist painter and sculptor . He had no formal art education . He was influenced by Picasso and the art of insane people .


(4) Child with Dove by Pablo Picasso (1881-1973) . This painting shows a child with red hair in a bluish-white dress holding a white dove . The background seems to be the walls and floor of a room in red , yellow , and blue . These colors are repeated in the ball on the floor . Can you see the clean large masses of colors ? The paint was put on with heavy strong brushstrokes . The child is tenderly holding the dove . Do you think it could be her pet ?
Pablo Picasso was a Spanish artists . He is considered as the most prolific painter ever , producing paintings , prints , engravings , book illustrations and sculptures . He was known to push the envelope .

Motivation : Birds have different body shapes . Some have crests , some have long tails . They may have different colors . Feathers overlap and create beautiful pattern .
Vocabulary :
Imaginary : existing in the imagination and not in the real world .

Foliage : leaves .

Crest : a comb or tuft of feathers on a bird's head .


Claws : a hard , curved nail on the foot of a animal or bird .


Collage : a picture made by fixing different things on a surface , such as pieces of cloth onto paper .

Overlap : to cover part of something .

Mosaic : a pattern of picture made up of small pieces of colored stone , tile or glass . ( In this case of colored tissue paper .)

Pattern : a repeating arrangement of colors , shapes , and figures .

Crumple : if you crumple a piece of paper , you crush it into wrinkles and folds .

Fantasy : something you imagine happening that is not likely to happen in real life .

Texture : the look and feel of something , especially its roughness or smoothness .
Wood's grain : small particules of the wood .

Activity :
(1) Think about the real or imaginary birds you want to make . Close your eyes and imagine your picture large on your paper .

(2) Choose several colors of tissue paper . Place tissue
paper and cut or tear pieces for each part of the birds' body . Make multiple cuts to make a lot of feathers at one time . To do this , cut several thickness of paper at once .

(3) Brush starch on white paper . Place tissue paper onto starch area and brush on a little more starch , to hold it flat . Too much brushing will cause some colors to "bleed".

(4) Add more pieces of tissue overlapping the shapes .The overlapped areas make different darken colors .

(5) For a variety of texture try crumpling some of the paper before adhering it .

(6) Exaggerate the tail feathers . Think about the bird gesture or movement .
(7) Fill in the background with small pieces of tissue paper in a mosaic-like fashion .

(8) Let dry .

Examples :


Saturday, February 6, 2010

Winter wonderland.

Grade level : This project was done with fourth graders , but it can easily be adapted for any grade level !

Objectives : This is just a project for the students to really have fun .

Materials : * 9' x 11' black paper

* crayons

* Epsom salt

* warm water

* Paint brushes and cups

Resources : www.theideabox.com (snow crystal picture) .

Motivations : Show the children different landscapes and scenes during winter . (Snow should be present .) For example children doing any winter sport such as skiing , ice skating , sledding , etc. Or kids having a snowball fight , etc .

Activity : 1. Ask the children to think about a scene during winter .

2. Ask the children to draw this winter landscape or scene with crayons (with the exception of the snow !!!)

3. Once the drawing is complete , they can paint the water and Epsom salt mixture over it . It will give the drawing a frosty , snowy cool look .

P.S. : Note for teachers : Once a student is ready you should make a mixture of Epsom salt and warm water . The proportion are about 1 cup of salt for 1 cup of water .

Here are some examples :

© 2010