Materials needed:
* Some salt dough we made last week (give each student a generous amount so he/she will be able to make two magnets and one plaque)
* A rolling pin
* Some plastic knives (to cut the dough neatly)
* Some toothpicks (to make designs on the dough)
* Some plastic straws
* Small plastic cups for water
* Some plastic picture frames 5" X 8" (to measure the plaque )
* Wax paper
* You may want to have some flour handy , in case things get too sticky .
Project :
Start by covering each desk with wax paper .
(1) Each students will start by kneading the dough a little bit to get rid of the air bubbles .
(2) Each student will then roll the dough flat with the rolling pin . He/she will use the plastic picture frame to measure the size of the plate . With a plastic knife he/she will cut around the frame . We now have the base of our plaque .
(3) Use a plastic straw to make two holes at the top of the plaque (so we will be able to put a ribbon through later on , to hang the plaque) .
(4) Now each student can decorate their plaque the way they want to . They can add flowers , ice cream , make a cat or a dog , or simply make a landscape . It is really up to their imagination ! When they add additional pieces of dough on the plaque , they should "glue" it by adding a little bit of water .
(5) The student can add details to their design , by using toothpicks , a plastic knife ,a straw , etc.
(6) Once the student is done with the plaque , he/she should set it aside on his/her desk .
(7) With the extra dough that a student has , he/she can now make a couple of magnets , once again , simply ,using their imagination . They should just use the dough as they would using play dough . They can once again add details by using toothpicks , a plastic knife or a straw .
(8) After the student is done , they should set the magnets aside on the wax paper .
Teacher's job :
Once every students are done with their salt dough art , it will be the teacher or art docent's job to bake every single piece . BE AWARE ! It will take some time . Use the oven at 350 F . The magnets could take about 2 hours (depending on their sizes ) and the plaques about 4 hours . Make sure each piece is completely dry on BOTH sides !!!!!!!!
Examples: Here are some examples of magnets and one plaque after they were baked .
A glass of refreshing lemonade . Look how the lines on the lemon and on the straw were added by using a plastic knife .
An apple on a book .
A cactus . This time the details were added with a toothpick .
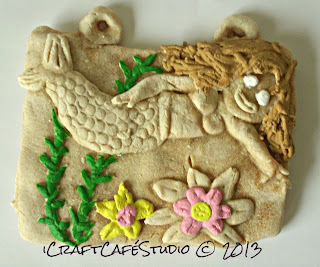
A little mermaid . The mermaid , the flowers and the algae were all modeled separately and then glued onto the plaque by using water . As you can noticed , there is already a little bit of paint on this item , which bring us to our lesson next week ,where I will explain how to paint and varnish the items . We will also add all the other finishing touches .


